Distance travelled by linear scale of screw gauge during two full rotation of circular scale is 1mm and circular scale has 50 divisions. In an experiment to measure thickness of a plate, six divisions of main scale are clearly visible and 28th division of circular scale coincides with reference line. Moreover when studs touch each other, zero of circular scale lies 4 division below the reference line, thickness of the plate will be:
Distance travelled by linear scale of screw gauge during two full rotation of circular scale is 1mm and circular scale has 50 divisions. In an experiment to measure thickness of a plate, six divisions of main scale are clearly visible and 28th division of circular scale coincides with reference line. Moreover when studs touch each other, zero of circular scale lies 4 division below the reference line, thickness of the plate will be:
Pitch p = 0.5 mm
Device has +ve zero error
R = 6p + 28p/50 - 4p/50 = 6p + 24p/50; 3mm + (24/50) * 0.5 = 3.24 mm
Similar Questions for you
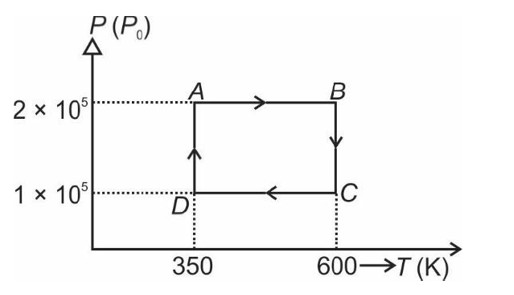
From A to B the process is isobaric

= W = 2 × R (600 - 350)
= 500 R
Taking an Exam? Selecting a College?
Get authentic answers from experts, students and alumni that you won't find anywhere else.
On Shiksha, get access to
Learn more about...

Physics Units and Measurement 2025
View Exam DetailsMost viewed information
SummaryDidn't find the answer you were looking for?
Search from Shiksha's 1 lakh+ Topics
Ask Current Students, Alumni & our Experts
Have a question related to your career & education?
See what others like you are asking & answering


